Let’s protect your error world”. Nvlddmkm.Sys is one of the most common Death errors on Windows 10. Nvlddmkm.Sys is a windows driver that allows your computer with hardware or connected devices. But it’s not a big problem from which one can’t fix it. There are 5 ways to fix Nvlddmkm.sys error in Windows 10.
In this fast era, we all want to work without any obstacles and want to achieve our targets on time. As time passed by, the demand and expectations of the user increase. In doing so, there is various type of errors that are experienced by the users.
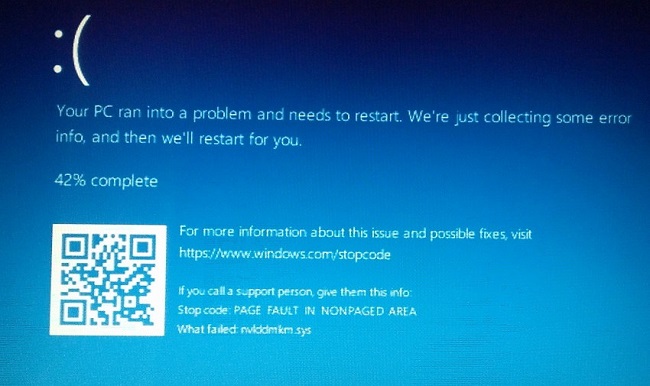
Every problem has a solution—similarly, Nvlddmkm.sys has various methods to sort out this problem. Windows is the most popularly used Operating system. Operating system users face Video_TDR_Failure (nvlddmkm.sys) in which the computer screen goes all blue, and the system also gets shut down.
In this article, we will discuss the cause of the error and also discuss the methods to overcome this problem. We will also guide you in which error what method you have to use. It will also save you time.
The Causes Close the Nvlddmkm.Sys error are Diverse, and Few of the Most well Known are:
- Faulty Graphics and Card driver.
- Conflict of programs with one another.
- Overloading of Graphics Card.
- Issues with RAM.
Now, there are various methods available to overcome this error. So, we can choose the appropriate method which will remove error at it’s best.
Read Also:
How to Fix Nvlddmkm.sys Error on Windows 10
Method 1: Reinstall Graphics Card Driver
Major issues that follow the Nvlddmkm.sys are BSOD Windows 10 error. In this case, you should reinstall the graphics card driver. The error is most of the time related to Graphics Card. This error pop in some computers that have been updated to windows 10 or changed a new Driver.
Step 1: Firstly, start your computer and then hold the power button until the computer shuts down automatically. You have to do this step more than 2 times until you see “Preparing Automatic Repair” on screen.
Step 2: You have to wait to see further options.
Step 3: Now, you have to go on advanced options.
Step 4: Now, you will see Choose an option, and you have to click on Troubleshoot.
Step 5: Click on Advanced options on the Troubleshoot screen.
Step 6: In Advanced options, select Startup Settings.
Step 7: Select the Restart option showing at the right bottom of the screen. Select the F4 key for the safe mode without network. Select the F5 key for the safe mode with Networking.
Step 8: Now, you will see that the system has booted in safe mode. Follow the following steps:
Step 9: Press Windows Key + X together and then Click on Device Manager.
Step 10: Click on Display Adapters tab & right-click on NVIDIA Graphics driver to Uninstall it.
Step 11: Click OK on the prompt window & check to Delete the driver software for this device before that.
Step 12: Also download and install the latest version of Driver again from their official website.
Step 13: Navigate to thr following address & find nvlddmkm.sys. Right-click & rename it to nvlddmkm.sys.old.
Step 14: When it asks for confirmation, press, OK.
Step 15: Search for the NVIDIA folder in the C drive of your system and copy & paste nvlddmkm.sys file to the desktop.
Step 16: Type the following commands by opening the command window.
Step 17: Copy the newly created nvlddmkm.sys file to C/: drive.
Step 18: Paste the copied file into the C:\windows\system32\drivers folder.
Step 19: Now, Restart your system.
Now when the system boots up usually, you will not find the nvlddmkm.sys error again n your system. If it happens again, then follow the following methods, as discussed below.
Method 2: Run a Disk Check on your System
Sometimes the nvlddmk.sys error occurs due to certain faults in the disk. Hence to fix this error, you need to learn you need to run a disk check on your system so that you can rid of the fault disk. But in doing so, store or save the critical data somewhere to avoid the data loss.
Follow the steps for checking the disk are as follows:
Step 1: Firstly, Press Windows Key+X together.
Step 2: Click on command prompt and Run as administrator.
Step 3: Type the following command in the command window: chkdsk/fc:
Step 4: Once you press the enter key, it will ask for permission to run a check at the next booting. Type Y and press enter.
Step 5: After that, exist the command window and restart the system.
Step 6: It will take approx 20 minutes for the disk checking process to get complete.
Step 7: At last, the error has been displayed, if any. Rectify those errors.
Method 3: Run a Memory Check on the System
After checking the disk, the error still exists then it might be possible that there will be an issue with the RAM. Thus run a memory check to fix this issue. Steps are as follows:
Step 1: Firstly, Press Windows Key+R to invoke a Run command.
Step 2:Then type mdsched.exe in the run box and click OK.
Step 3: Now choose either Restart now and check with problems or Check for the problems next time I start my computer.
Step 4: It will take approx 15-20 minutes to memory check to complete.
Step 5: Once the errors displayed on the screen, fix them using suitable methods.
Method 4: Remove Any Conflicting Programs
There must be chances that any recently installed program is causing the nvlddmkm.sys error. This problem can be fixed by removing any recently added programs or by restoring the system to an earlier date. After doing this, you can check whether the system error has been fixed or not.
Method 5: Change the Graphics Card
If your Graphics card is overloaded, then you might have to change your graphics card. The games we play or applications we use may overload the graphics card. It may cause an error.
To fix this error, the best possible way is to change your graphics card with a new one. By using this simple method, you can get rid of this time-consuming error easily.
Read Also:
Method 6: Update your Windows
The developer updates new windows every month. So, there will be a high possibility that you will fail to update your windows to the latest. Also, it will make your system damage and infected from malware.
For this, you should use the legal windows and also enables its automatic update so that half of the issues won’t come into your system. Follow these steps to check the available updates on windows 10:
Step 1: Firstly, Press Windows+I keys simultaneously. This will open window settings.
Step 2: Click on Update & Security from the options.
Step 3: Now select the Windows Update tab from the left panel.
Step 4: Lastly, click on the check for updates option. It will automatically download updates if there is any available.