Service Host Local System, often represented by the process name “svchost.exe,” is an integral part of the Windows operating system. However, many users encounter an issue where Service Host Local System consumes a significant amount of disk, CPU, and memory resources, causing performance problems.
In this comprehensive article, we delve into the meaning of Service Host Local System, explore the causes behind its high resource usage, and provide easy-to-follow methods to fix this common issue.
Understanding and addressing Service Host Local System’s resource-hogging behavior is essential for optimizing your Windows PC’s performance. By the end of this article, you’ll be equipped with the knowledge to effectively tackle Service Host Local System’s high resource usage.
Meaning of Service Host Local System:
Service Host Local System, or “svchost.exe,” is a critical Windows process responsible for hosting and managing dynamic link libraries (DLLs) of various services running on your computer. It acts as a container for multiple Windows services, allowing them to run efficiently and share system resources.
Read Also:
Causes of Service Host Local System High Disk, CPU, and Memory Usage:
Service Host Local System’s high resource usage can be attributed to several factors:
- Multiple Services: As a host for numerous services, Service Host Local System can accumulate resource usage when multiple services run simultaneously. This can strain CPU, memory, and disk resources.
- Software Conflicts: Incompatibility or conflicts between third-party software and Windows services hosted by svchost.exe can lead to resource consumption issues.
- Malware or Viruses: Malicious software can disguise itself as svchost.exe, causing it to consume excessive resources. Malware-related high usage is a security concern.
- Windows Update: Windows Update is often run through Service Host Local System. During update checks and installations, it can consume substantial CPU and disk resources.
- Resource-Intensive Services: Some services hosted by Service Host Local System, such as Windows Update or Windows Defender, may have resource-intensive tasks that temporarily increase CPU and disk usage.
- Outdated or Faulty Drivers: Incompatible or outdated hardware drivers can lead to conflicts and increased resource usage.
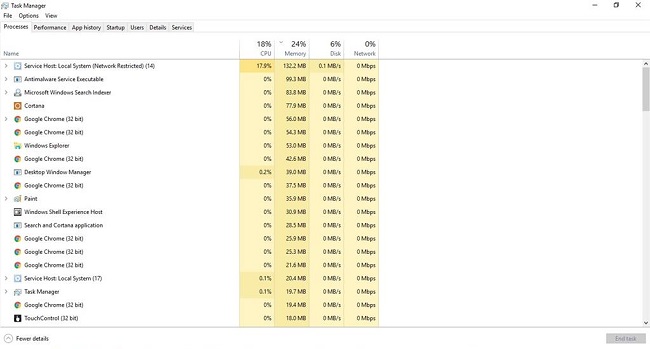
How Can You See Service Host: Local System Running on Computer?
So, to see Service Host: Local System running in your computer you are required to press CTRL+ALT+DEL then you will get the quick access to Task Manager and then stay on the first process Tab, by scrolling down you will find many Service Host related processes for example Service Host: Local System (Network Restricted), Service Host: Local Service, Service Host: Network service and many more.
Henceforth, Service Host: Local System is a significant cause of windows 10 hundred (100) % disk usage in Task manager.
Why Service Host: Local System is Consuming Resources Out of Control?
Service Host: Local System is a generic service hosting container. It is a bundle of system processes including windows Auto Update and also many required system services would be running in it, that is the reason why it takes up colossal disk, memory, RAM and network bandwidth, draining computer resources mostly happened after having windows 10 updates.
Service Host: Local System consumes High CPU because of that battery drains out very fast; therefore, it’s better to disable the following services which are continuously running simultaneously to check updates for your computer, the two services are; Windows update and Background Intelligent Transfer Service.
The following steps are: Firstly, go to the task manager then open the services tab and then go to open services which is visible at the bottom. Secondly, Stop the above mentioned two services and then disable them from their properties.
How to Resolve the Service Host: Local System Related Error?
Following are the methods by which you can resolve this particular issue-
Method1 – Disable the Superfetch Service
Step 1 – By pressing Windows Logo key + R to open a Run then type service.msc into the Run dialog and after that press Enter.
Step 2 – Then, you need to scroll down the list of services on your computer, locate the service which is Superfetch then, double click on Superfetch to edit the particular settings on it.
Step 3 – Click on stop ( to stop the service) and set the startup type for Superfetch to disable it.
Step 4 – Click on apply after that on ok.
Step 5 – Now, restart your computer.
Method 2 – Fix the Memory Leak Error in the Non-Paged Pool of Memory
This method can also be used to resolve the issue if Method 1 doesn’t work.
Step 1 – Start by pressing Windows Logo Key + R to open a Run then type regedit into the Run dialog and press Enter.
Step 2 – On your left pane of the Registry Editor navigate to the following; Click on services and then scroll down under services and select Ndu.
Step 3 – On your right pane locate and double-click on the registry value named Start to modify it and change its value data to 4 this will disable it and plug the memory leak in the non- paged pool then click ok and close the Registry Editor.
Step 4 – Finally, restart your computer. Once the entire procedure is completed successfully, you will observe that System Host: Local System is no longer using the huge amount of your CPU or Disk.
Method 3- Running the System File Checker
To start the process,
Step 1 – Open the start menu and type cmd and right click on ‘Run as Administrator’.
Step 2 – Now, accept the UAC prompt when it comes up.
Step 3 – In the command prompt, type the sfc/scannow after that press enter.
Step 4 – You need to wait for the scan to successfully complete.
Step 5 – Once the scanning is complete then enter the command dism/Cleanup-Image/ RestoreHealth after this command finishes running then observe your CPU and Memory load and check if the issue still there.
Method 4 – By killing SVChost
Killing the Service Host process in the Task Manager can solve the issue
Step 1 – Press Ctrl + Shift + Del to start Windows Task Manager or click on the taskbar and select Task Manager.
Step 2 – Click on more details to expand the manager; this will reveal all the running process.
Step 3 – Now, search through the process for Service Host: Local System , this process hosts Windows Update as well as the update Orchestrator Service, select the task and click End task.
Step 4 – when the confirmation dialog shows up, you need to check to Abandon unsaved data and shut down then click the Shutdown.
Step 5 – Finally, check if the issue has been solved.
Using Some Easy Methods to Fix Service Host Local System High Disk, CPU, and Memory Usage:
- Identify Resource-Hungry Services:
- Use Task Manager (Ctrl + Shift + Esc) to identify the specific service under Service Host Local System that is consuming resources.
- Right-click on the high-usage svchost.exe process, select “Go to service(s),” and note the services using excessive resources.
- Restart Services:
- After identifying the problematic service, open “Services” by typing “services.msc” in the Run dialog (Win + R).
- Locate the corresponding service and restart it. This can often resolve resource usage issues.
- Windows Update Troubleshooter:
- Run the built-in Windows Update Troubleshooter to address update-related resource consumption problems.
- Malware Scan:
- Perform a thorough malware scan using reputable antivirus or antimalware software to ensure your system is free from infections.
- Update Drivers:
- Ensure all device drivers are up to date, especially graphics, chipset, and storage drivers. Visit the manufacturer’s website for driver updates.
- Disable Non-Essential Services:
- Open “Services” (services.msc) and disable services that you don’t need or use. Exercise caution and research before disabling any service.
- Limit Background Apps:
- In Windows Settings, go to “Privacy” > “Background apps” and disable unnecessary apps running in the background.
- Adjust Windows Update Settings:
- In Windows Settings, go to “Update & Security” > “Windows Update” > “Advanced options” and limit the bandwidth used for updates.
- System File Checker (SFC):
- Open Command Prompt as an administrator and run “sfc /scannow” to scan and repair corrupted system files.
- Use Resource Monitor:
- Resource Monitor (resmon.exe) provides detailed insights into resource usage. Use it to identify specific resource hogs and take action accordingly.
- Consider an SSD Upgrade:
- Replacing a traditional hard drive with a solid-state drive (SSD) can significantly improve disk-related performance issues.
- Revert to a Previous Windows Version:
- If a recent Windows update caused the problem, consider rolling back to a previous Windows version.
- Seek Professional Help:
- If you are unsure or uncomfortable with advanced troubleshooting, consult a professional technician for assistance.
Read Also:
Conclusion
Service Host Local System (svchost.exe) is a crucial part of Windows, but its high disk, CPU, and memory usage can be frustrating. By understanding the causes behind this issue and implementing the provided solutions, users can effectively optimize their systems and regain control over resource usage.
With the knowledge gained from this article, you’ll be better equipped to tackle Service Host Local System’s high resource consumption and enjoy a smoother computing experience.